

Archicad 25 - New Casework Cabinet Objects!
Aug 13, 2021In Archicad 25 the biggest and most exciting change to the object library was the casework objects, used for kitchens, bathrooms, laundry, and even closet cabinetry.
These objects got a total rebuild in v25, which now enables you to define and control much more of the geometry and cabinet design than ever before.
There are also some quirks, and in this video and writeup we'll explore the new features, positive enhancements, shortcomings and pitfalls to watch out for when using these new objects.
Overall, they offer a much needed upgrade, which greatly enhances your ability to design various styles of cabinetry, with totally new flexibility.
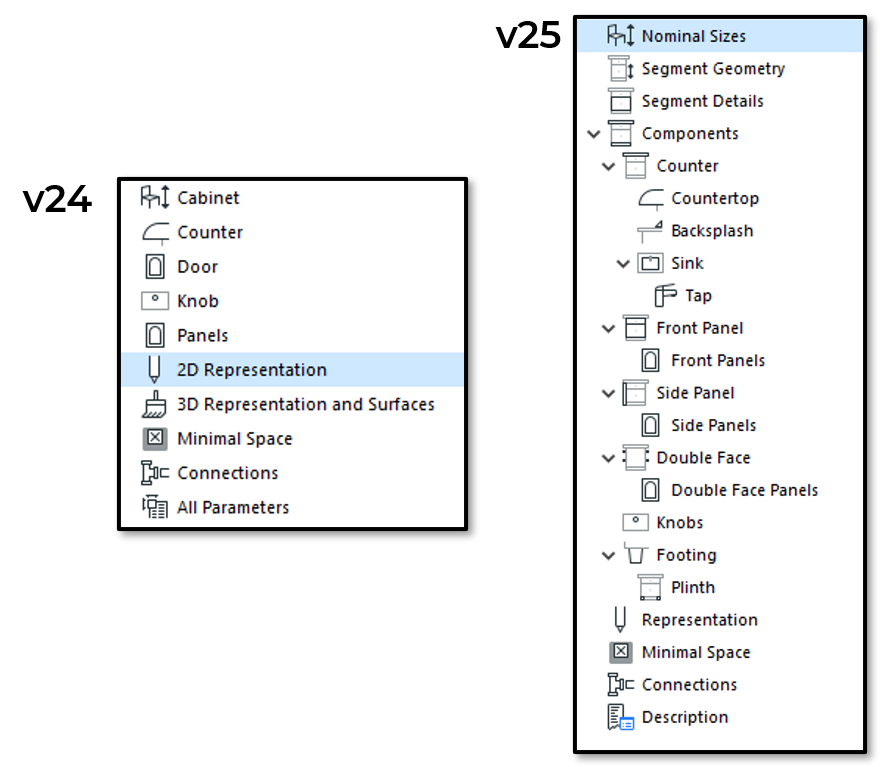
When comparing the Archicad 24 objects to the new Archicad 25 casework objects, you'll notice we have a few less. 32 before, and now down to 22.
The previous sink/oven combo elements were eliminated, and the base, wall, and standing elements have been reconfigured into the new tools.
Object Migration
Being that the new casework objects have been totally rebuilt, when first opening a v24 file in v25, you'll need the migration library to retrieve the previous versions. The 24 casework objects won't automatically update to v25.
While it may add a little work, the new objects present some new possibilities!
The v25 settings dialogue has been expanded, with new functions, features, and abilities to control the design.
So let's dive into it, starting with likely the most common object you'll use, the Base Cabinet Block 25.
TIP: 3D Object Preview You can now rotate the object preview without effecting the rotation of the object in space. This is a much needed enhancement to the object settings! It doesn't make much sense to use the preview for rotating in space anyway right? At least now you won't have to correct the object placement after looking to see the rear end of it in the preview...
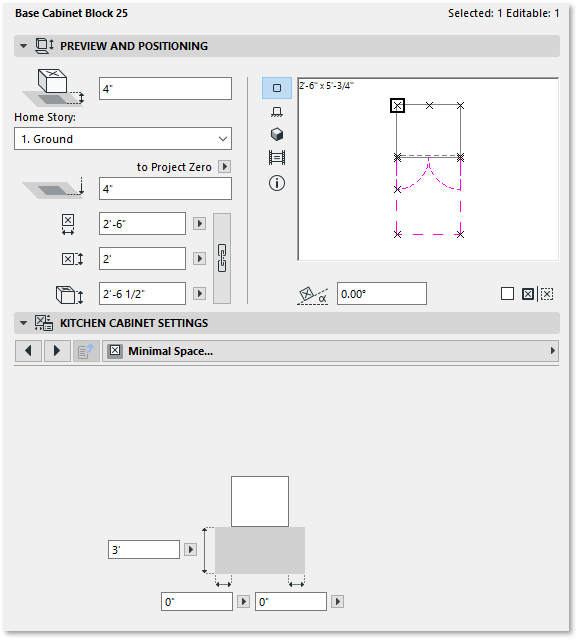
Base Cabinet Block 25
This base cabinet block is highly flexible, and includes the options for doors, drawers, open shelves, panels, counters, sinks, taps, and more, but let's start with the overall size.
Cabinet Nominal Sizing:
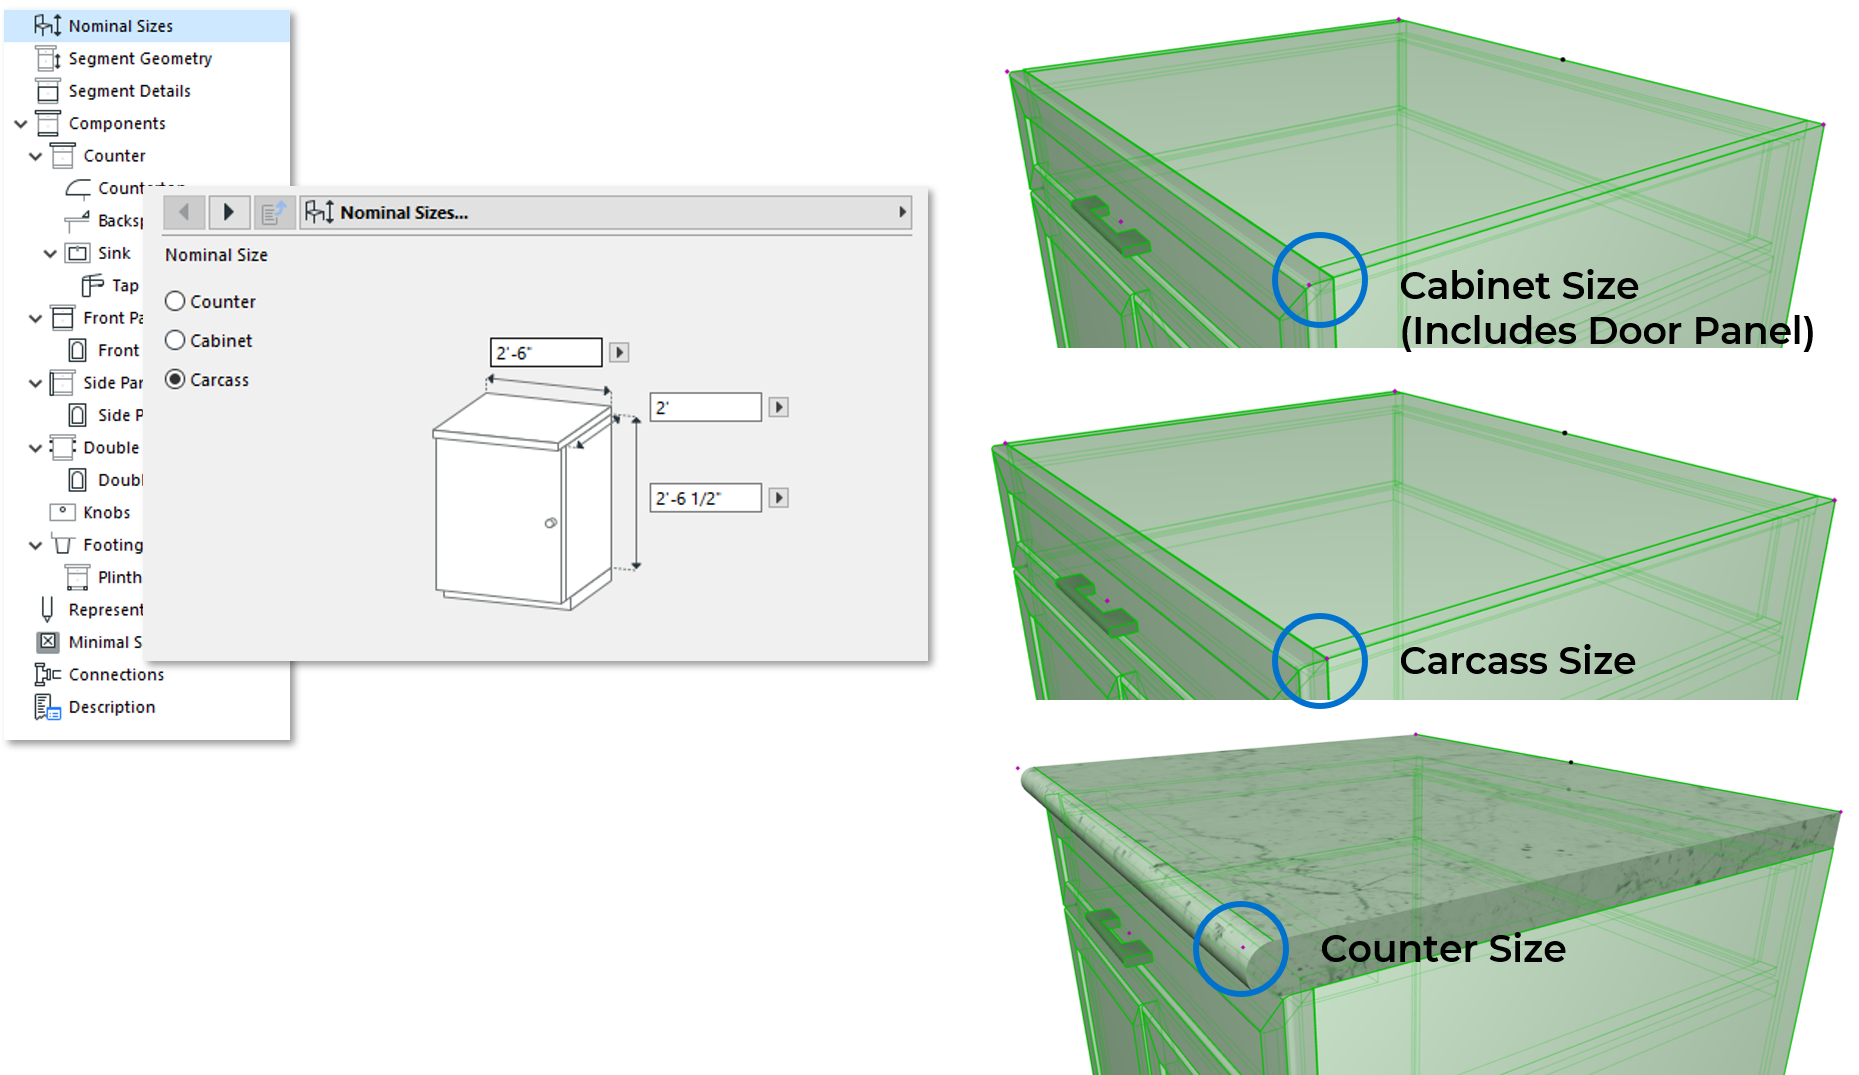
The new casework objects has a dialogue for setting the nominal width, height, and depth of a casework object.
Notice in the snip below the difference in the nodes relating to this nominal size.
By setting this option to Cabinet, the overall dimensions you specify will include both the carcass, and the doors/drawer thickness on the front. Not quite ideal...
Setting the option to the Carcass, measures the element based on the box, without the door/drawer depth. This is the preferred method, as typically the base is set to an even 24". With a typical door depth of 3/4", total cabinet depth would be ~24 3/4". It's a little easier to specify an even 2' box depth, than having to think about doors and drawer thickness.
Nominal Sizes
Also notice the height of the nominal size. This does not include the footing! The footing height and the elevation of the object are now dependent, so that's a setting to make sure to check.
Also, when enabling the counter, you'll see the node automatically moves to the extents, regardless of which nominal size method is used.
Setting the nominal size based on the counter would require a little extra work to determine the right carcass, based on offsets in the counter settings. This could be useful when building a casework element for an island, but you can easily set the counter overhang in the reverse method just as easily.
Segment Geometry & Details
The new Segment Geometry and Segment Details settings allow you to create up to 5 segments within an object. A segment can be a door, drawer, panel, or open shelf, and in the setting you can define the height of each, or set all to equal heights.
NOTE - Segment 1 starts from the bottom, and counts up. This is a useful reference to keep in mind when editing settings in other dialogues.

The drawer, panels and shelfs are limited on the options, but notice how many different door configurations there are.
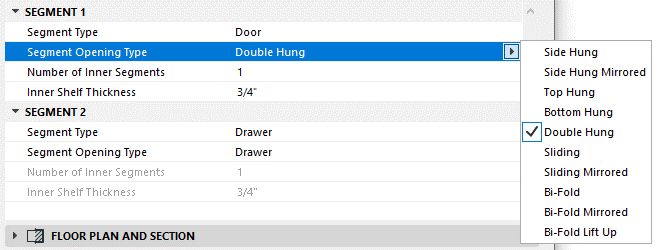
Side Hung would be your typical single door cabinet, double hung would include 2 door panels opening to the sides, but there's also options for top, bottom, sliding, bi-fold, and mirrored/reversed configurations.
You can also set the number of inner segments (shelves within the box), and their thickness.
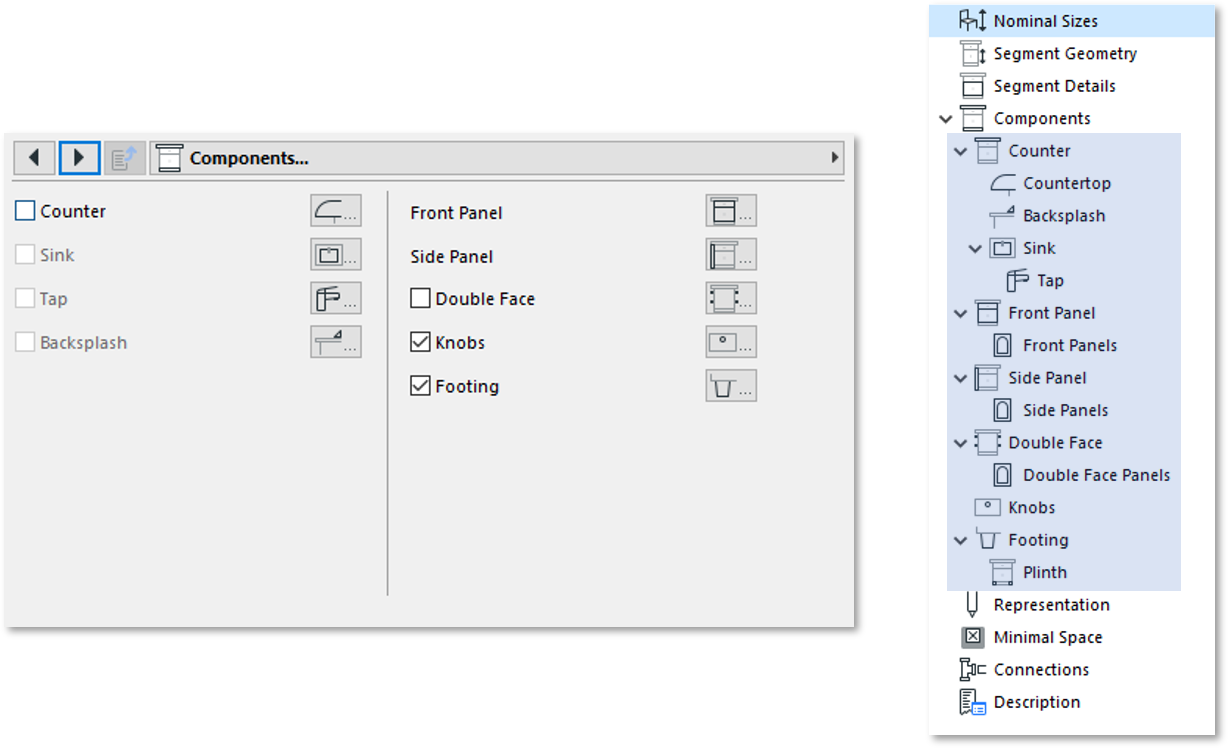
Components Options: The new casework objects have the ability to turn on Counters, Sinks, Taps and Backsplash components, as well as settings relating to Front Panels, Side Panels, Rear Double Face options, Knobs, and Footings.
By enabling these components, additional dialogue options will be available.
Counters
I'll be honest, I've never been a big fan of using the built-in counters and sinks with casework objects. I've always preferred to model counters and plumbing fixtures separately, as it helps with quantification and listing of individual components.
But... the new counters have some nice features to them, including enhanced edge settings to chamfer or fillet the top and bottom edges.
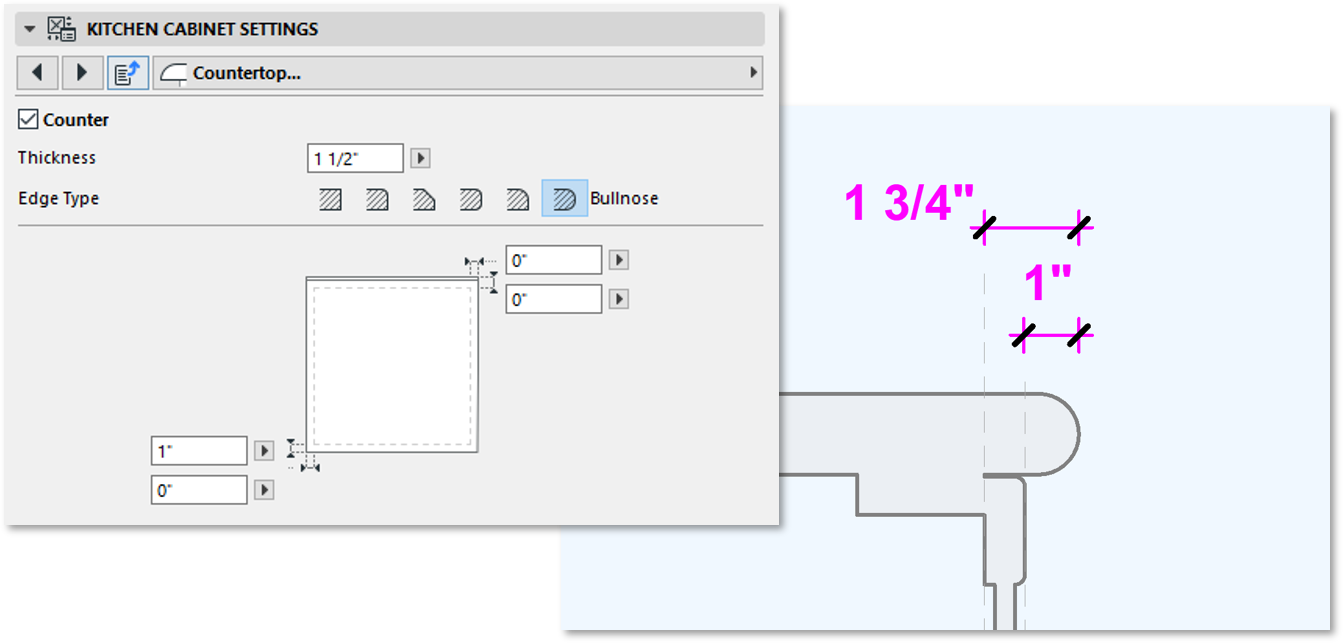
Note! - Overhang distance of the counter (set to 1" in this sample) will offset from the front of Doors/Drawers, not from the carcass/box based on the nominal setting.
Backsplash
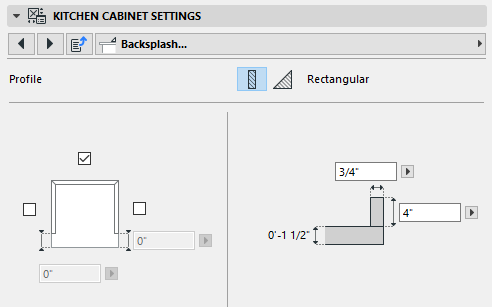
This setting is pretty straight forward. Choose the sides, and set the size.
See if you can figure out a good use for the triangle option.
Sinks & Taps
Once the counter has been enabled with your objects, you can add a sink and tap, which obviously only applies for the base cabinets.
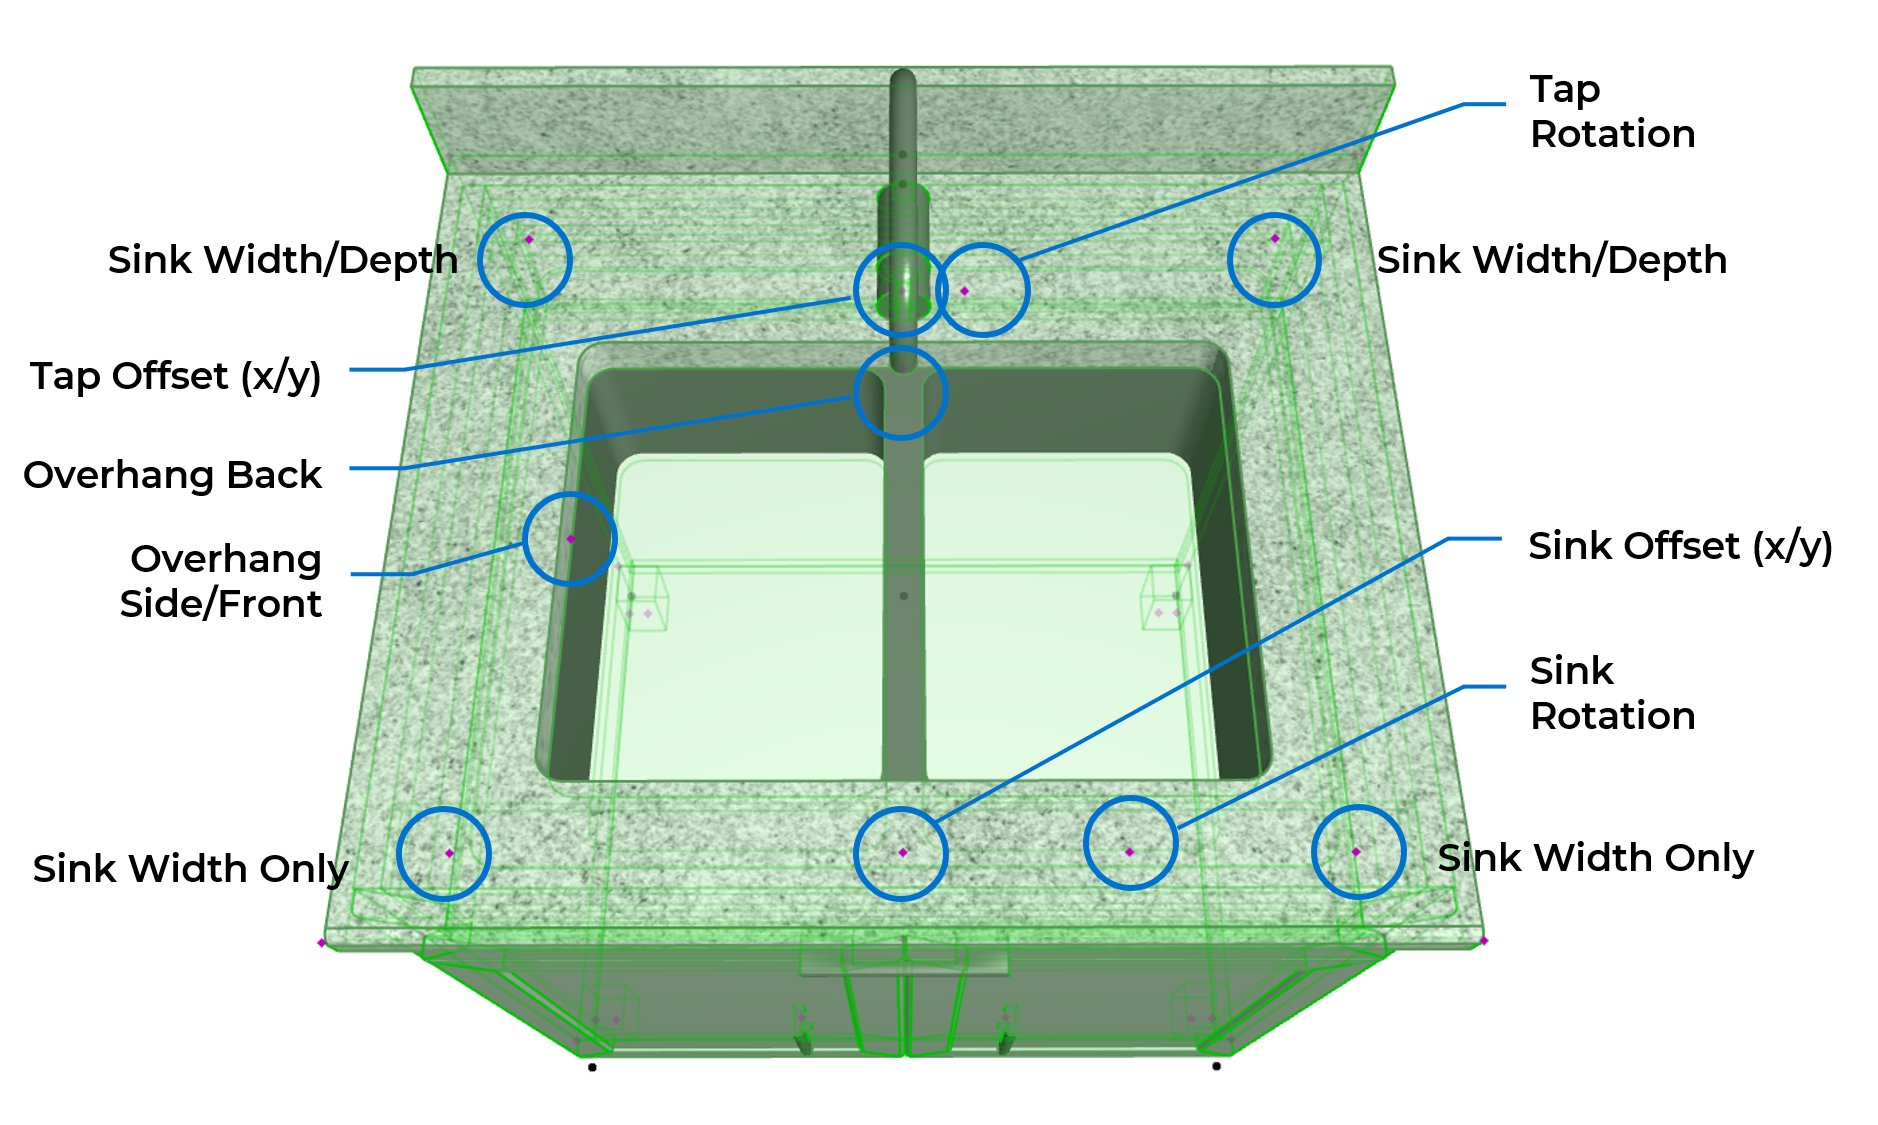
When enabling these features, there are a ton of new 3d nodes you can use to stretch, rotate and position these components.
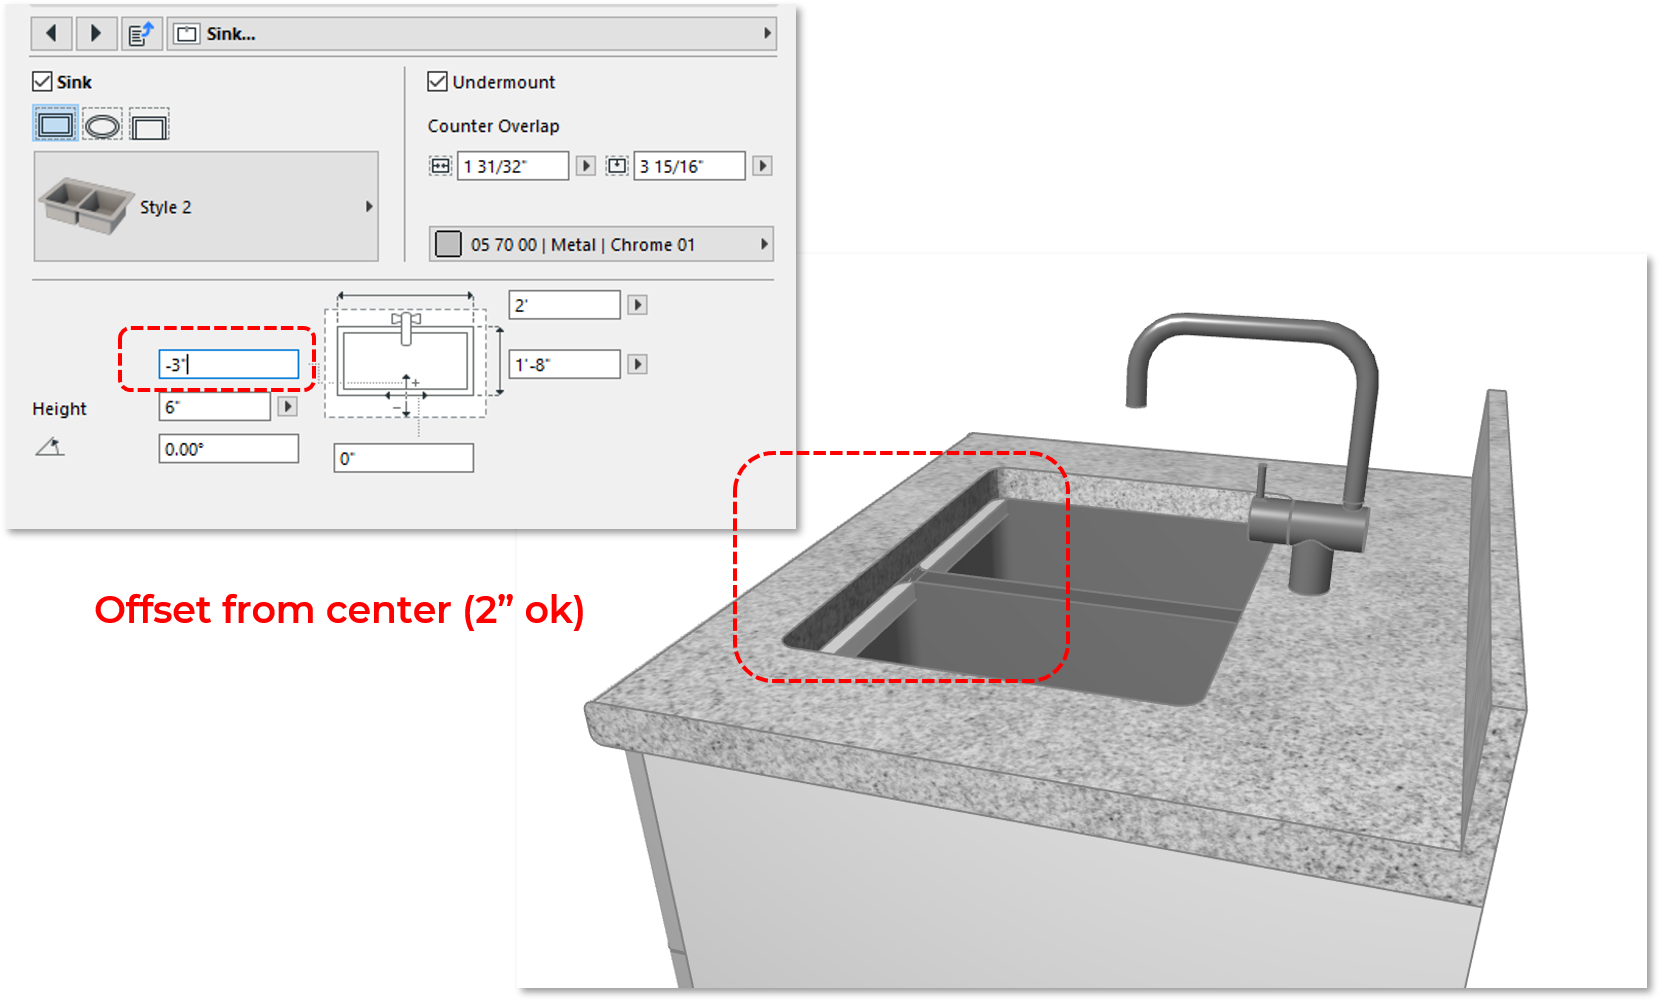
Sink Settings
The sink component allows you to select from various types of sinks, and set the width, depth, and height of them through these inputs.
There is a front/back offset option highlighted here, where it's possible to overlap with the carcass/box as shown. In this sample, 3" would pick up the box, where 2" would be ok. This setting will vary depending on the depth of your sink, but this offset is from center position.
There are a few new styles of sinks and taps available, but many will look similar to previous object settings.
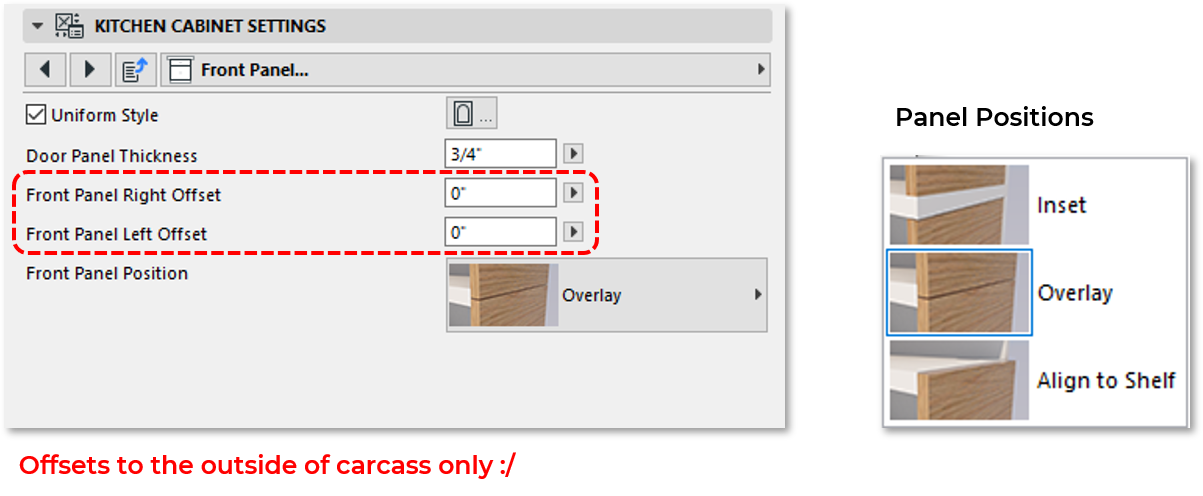
Front Panel
The front panel settings enables you to apply a uniform style, which will save you time later on if you know that each face should be the same.
Note - Offsets from Right/Left are always outside the box, not inside.
Panel Options
The new panel settings contain 3 styles to choose from. Solid, Framed, and Custom.
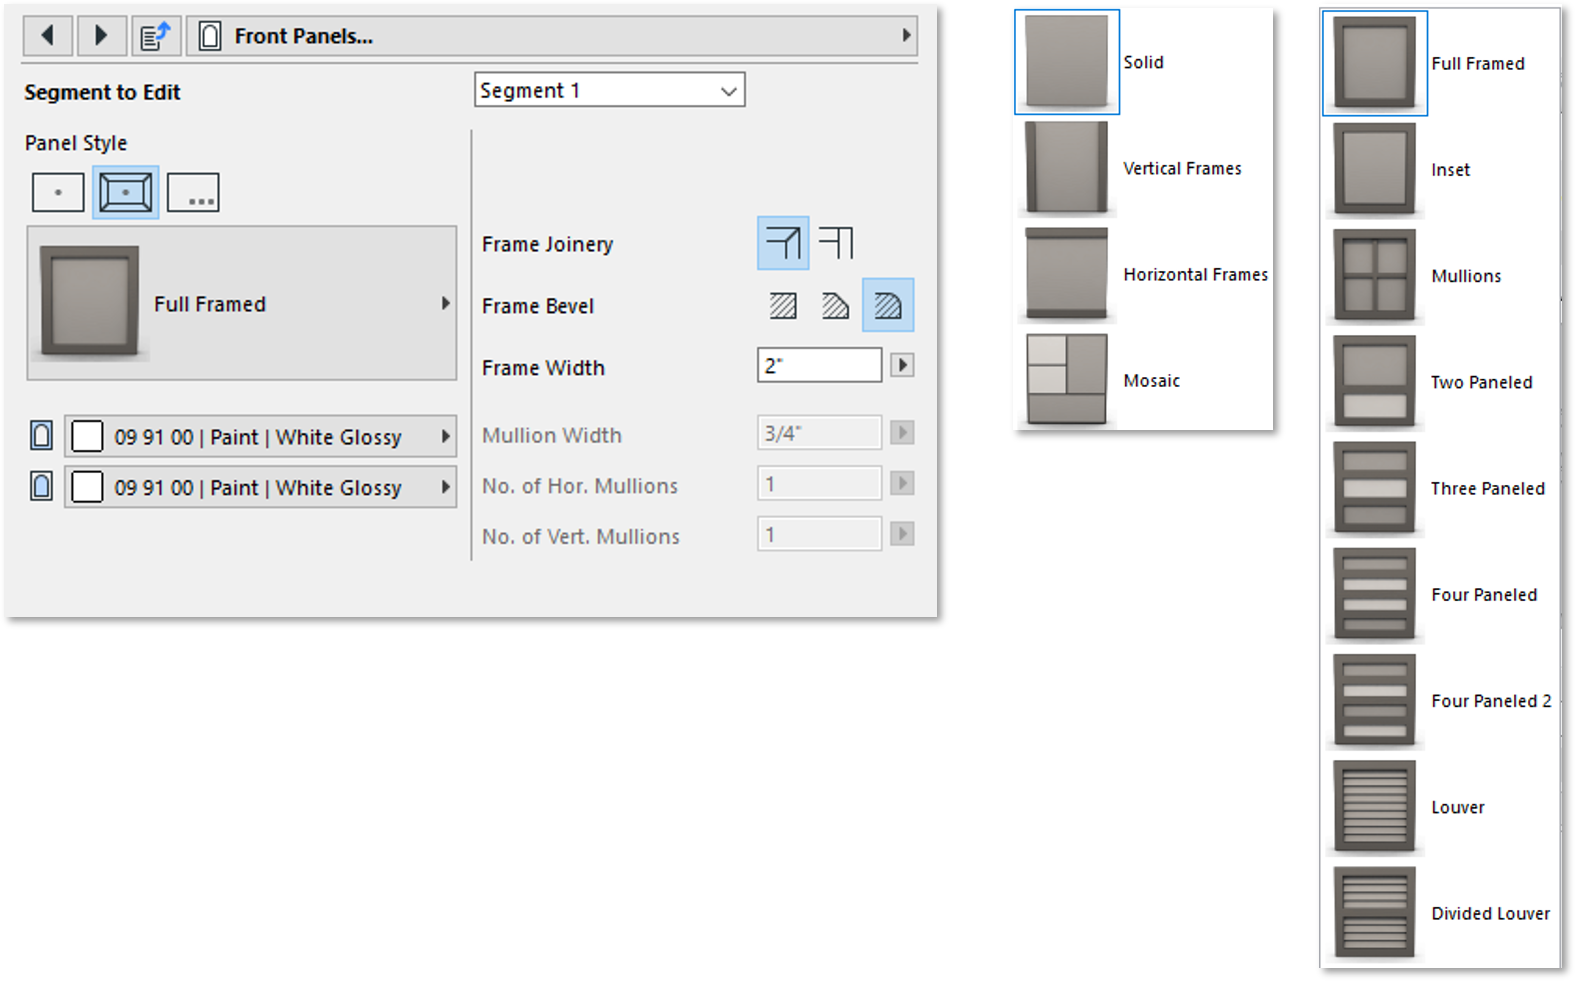
You can set the panel type, surfaces, joinery method, bevel, and width from within these settings. Million enabled panels allows you to set the numbers, but most other panel options are fixed.
Important Note - If you decide to edit segments individually, make sure to uncheck "Uniform Styles" from the previous dialogue.
Side Panels
You can easily add left, right, and rear panels to your casework object. When doing so, note the intersection settings.
Each face has options for offsetting in both the positive (outside) or negative (inside) directions.
Double Faced
The double faced option enables you to add doors, panels, or open shelves to match the segments.
There are some logical limitations to the double faced panels, and when drawers are the segment type in the front, you can only add a panel or open face on the back.
You can however add doors, to the rear side of door segments!
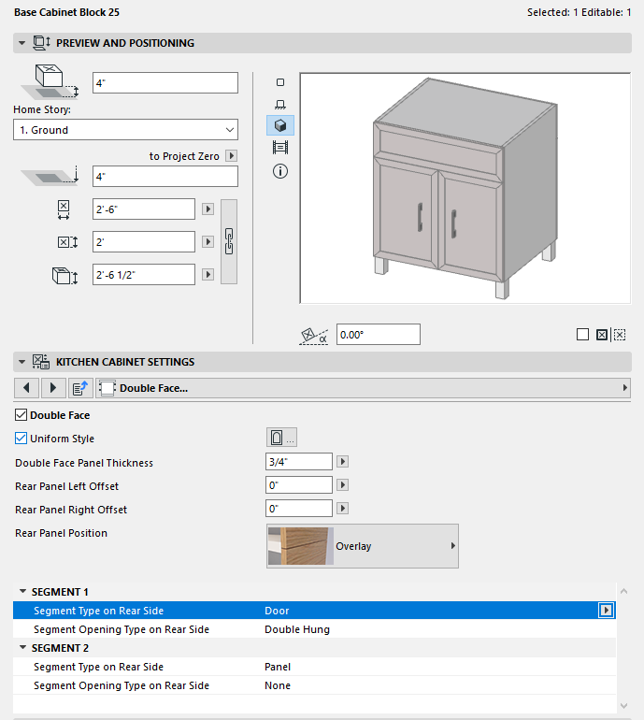
And you can also match an open segment all the way through!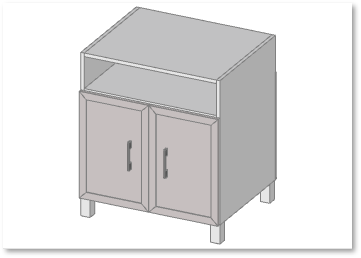
Knobs
The new knobs are awesome, and extremely frustrating at the same time! You'll quickly find you're constantly resetting these to the correct position, and this is one of the biggest updates needed to the casework objects!

Notice when changing the width or height of the casework object, the knobs will reset to their default positions. (Also you can see how the footings remain in place... not good either)
But there are some positives with the new knob options!
There are know 5 styles to choose from. Pull, Linear, Cutout, Profiled, and Custom.
(and yes I'm making these descriptions up, I couldn't find the Graphisoft name:)
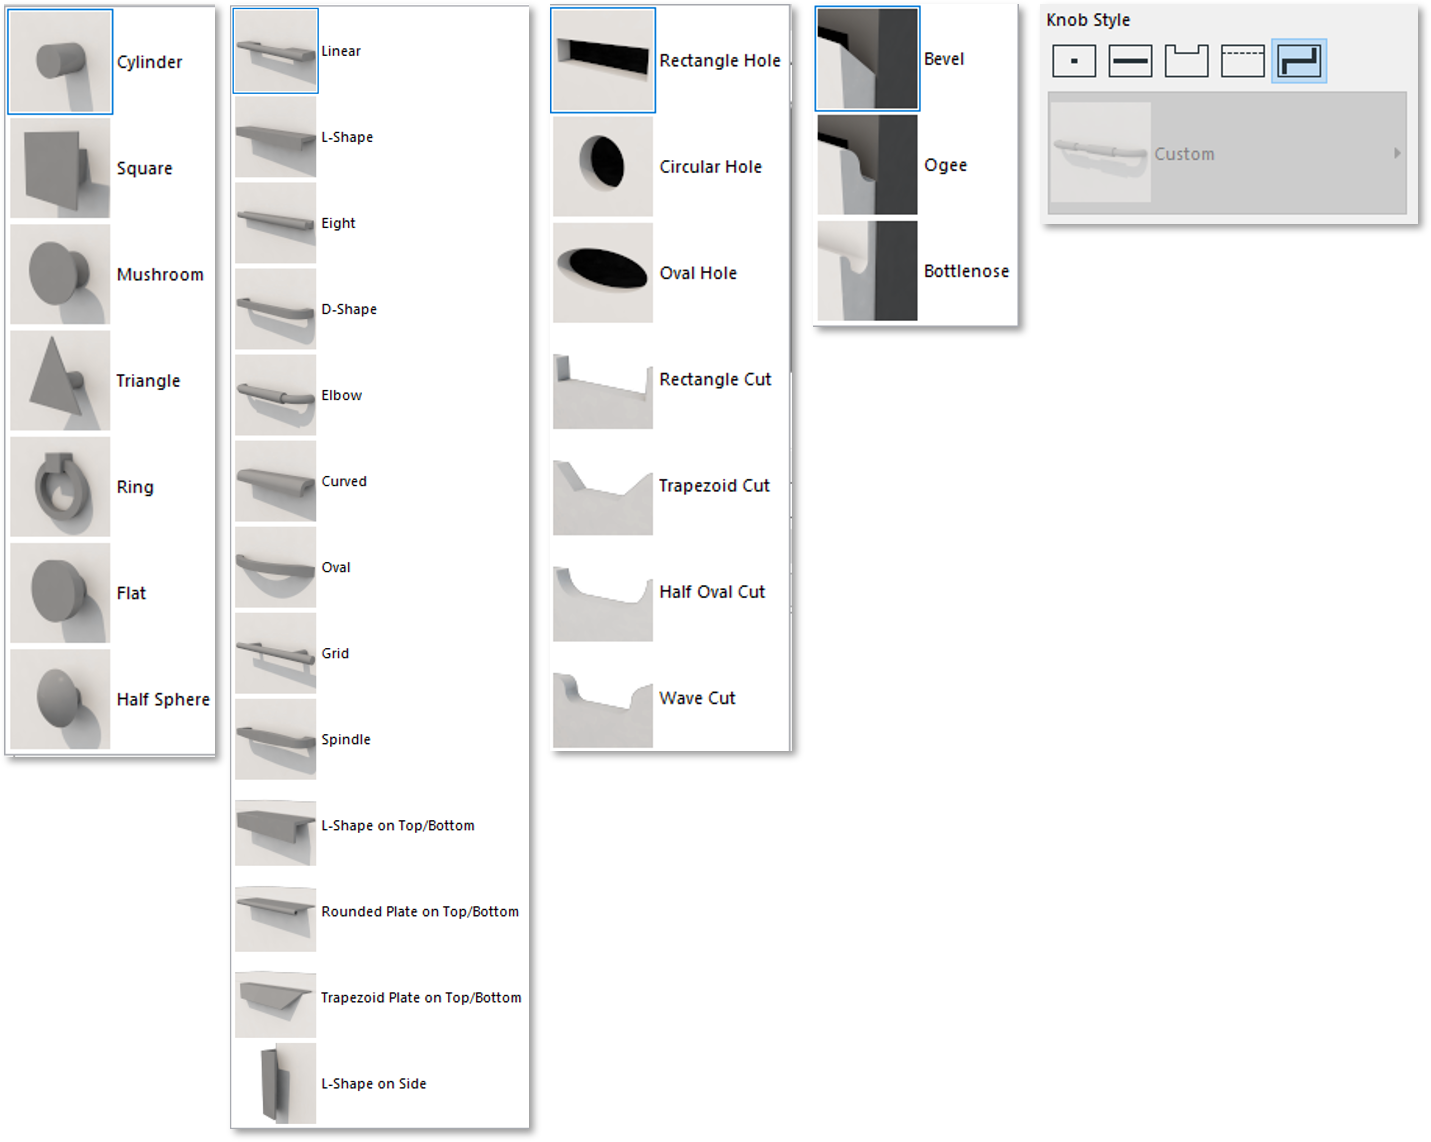
There are a lot of new knob options to choose from, and the linear additions, and new cutout and profiled edge are definitely a nice modern style.
In addition to new styles, there are also new input nodes in 3d for adjusting knob locations. This is helpful, especially when reviewing casework objects in section or interior elevations.
Warning!!! - setting the knob positions to their final location is best done after you've dialed in the nominal size of your cabinets, adding and adjusted segments, and have chosen panel types. If you try to set knobs early in the process, likely you'll be resetting them later!
Footings
If you're using the solid footing setting with the new casework objects, you won't run into many issues. Work just fine!
Note - The footing height is considered separate from the cabinet/carcass height! The elevation noted in the position dialogue, directly relates to the footing height. Essentially, the cabinet elevation starts at top of footing in this case. Make sure these are equal.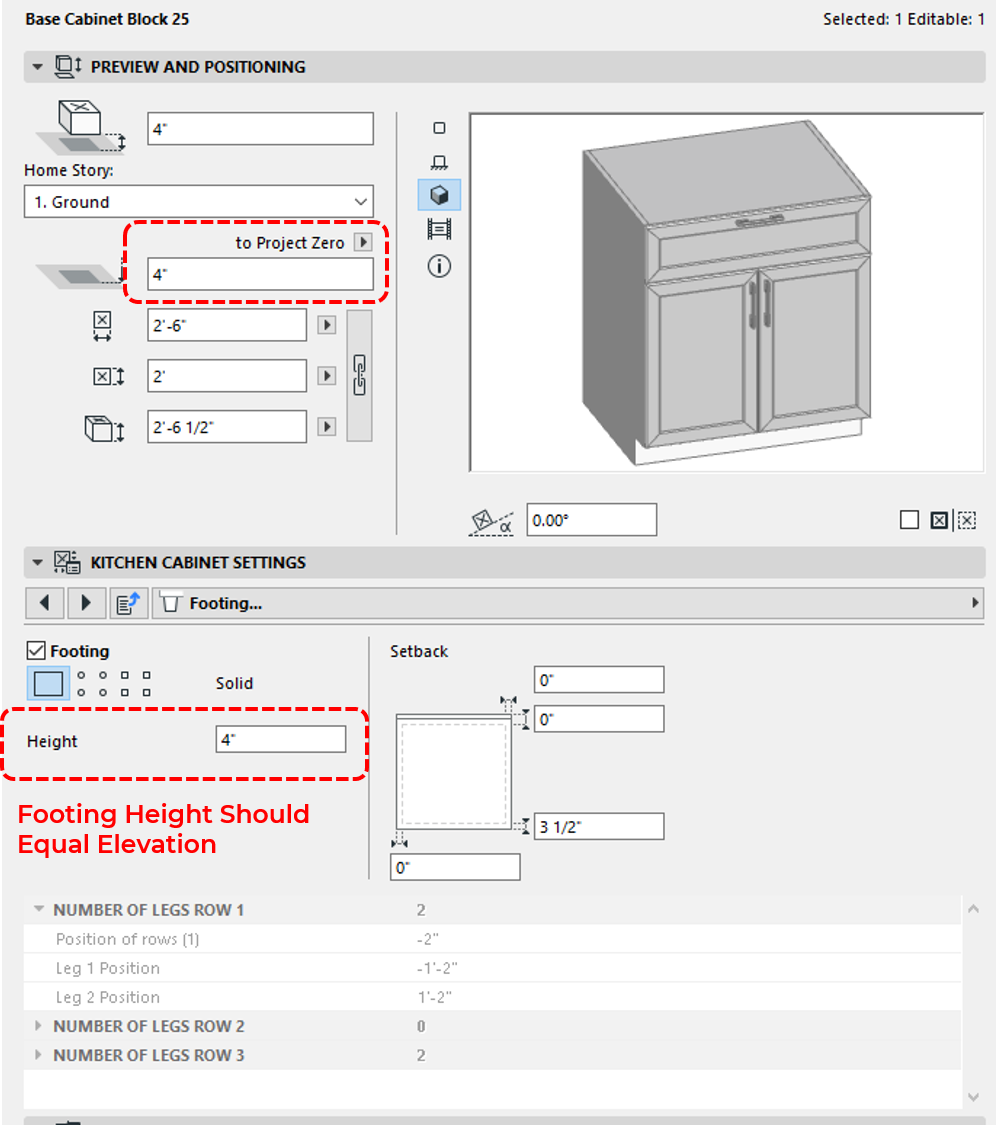
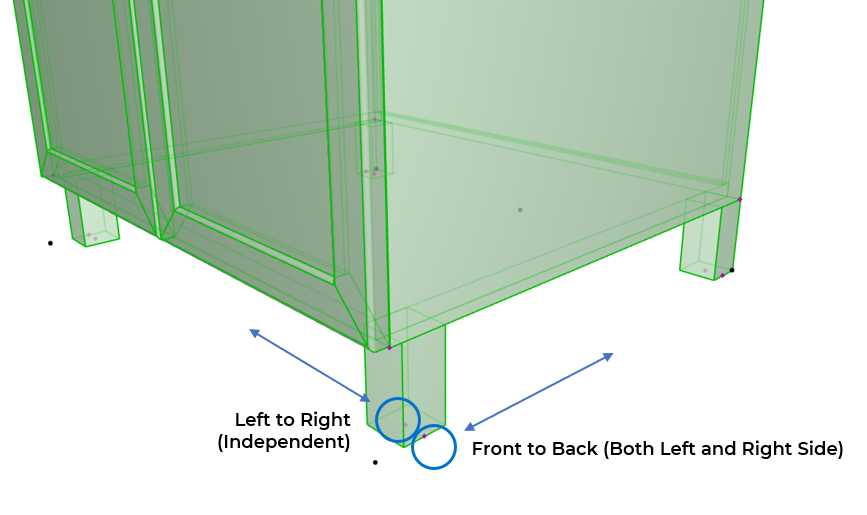
If you decide to add round or square feet to your cabinet, you'll likely be playing with the settings and offsets to get them right.
If you want to do the math, you could probably figure these out in the settings dialogue, but I've found it easier to adjust using the new 3d nodes to get close, and then plug in the correct value once I can determine it!
Note - You can add up to 3 rows of legs, and up to 15 legs in each row! That's crazy! I'm sure there are some interesting outside the box uses here, but that's for another day!
Plinth
As part of the footing settings, you can also apply a plinth (horizontal panel) around the based of the casework object.
And that brings us to the end of the components section! A lot of them I know!
Cabinet Representation Settings
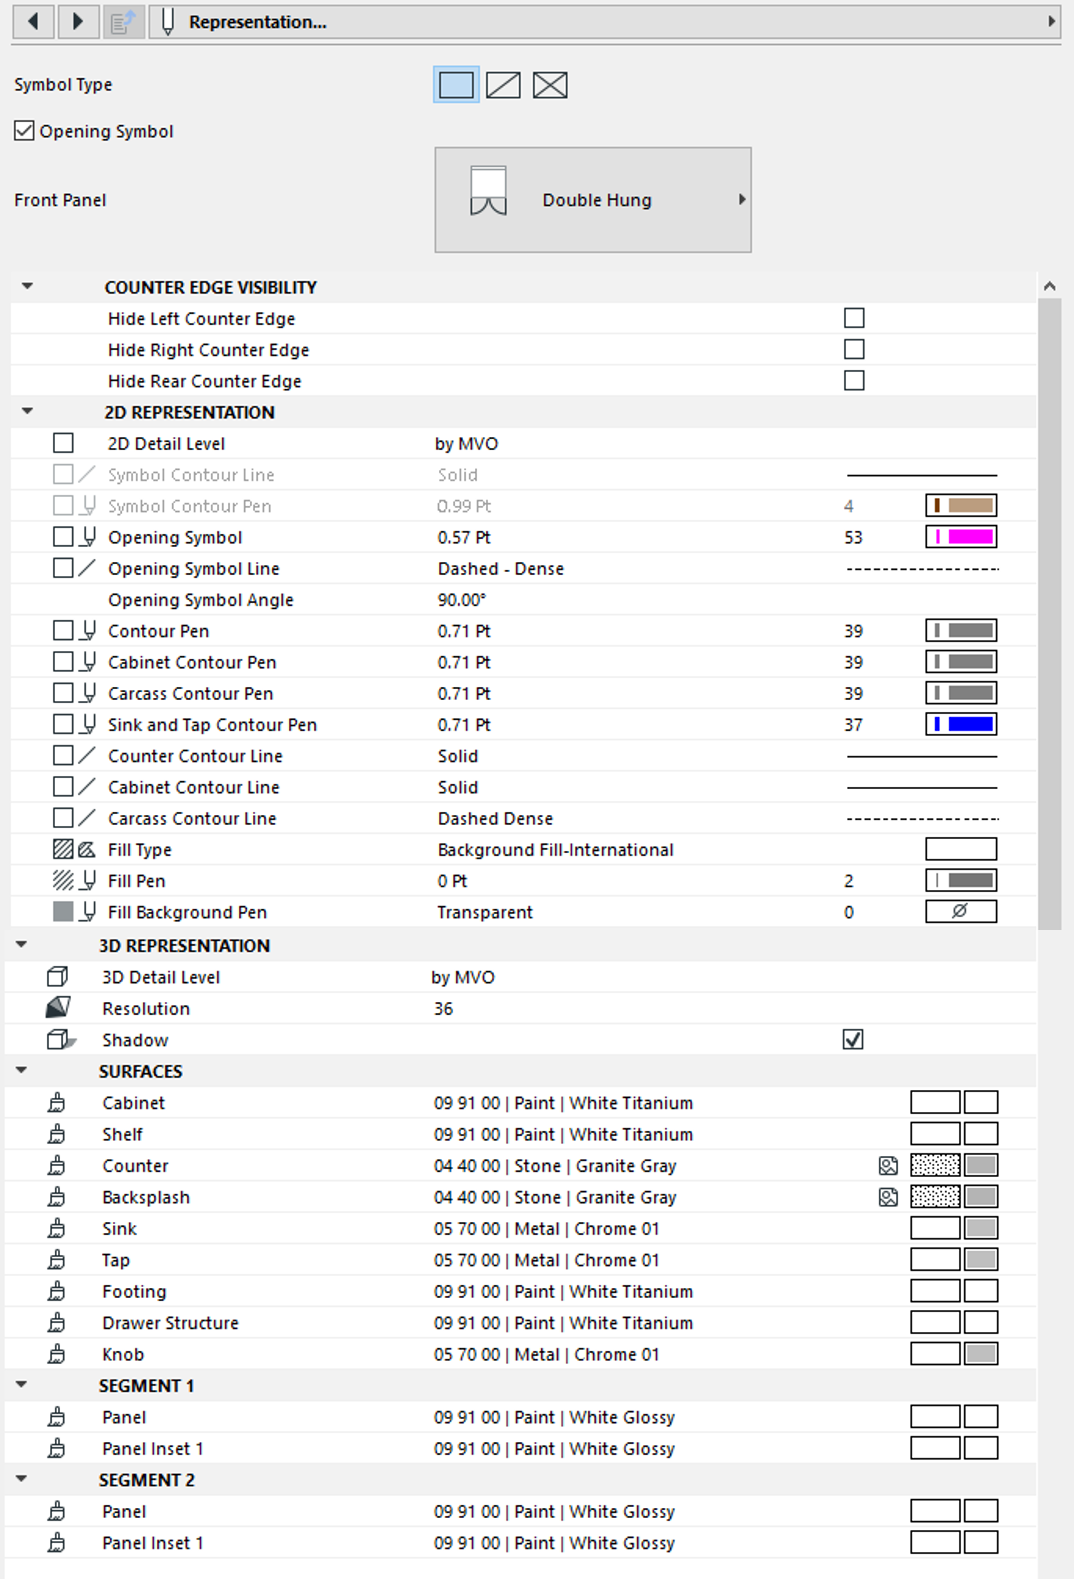
There is a lot packed into the Representation settings of new casework objects.
You can define a Symbol type, to include a dash or cross.
You can define an Opening Symbol, for either doors or drawers.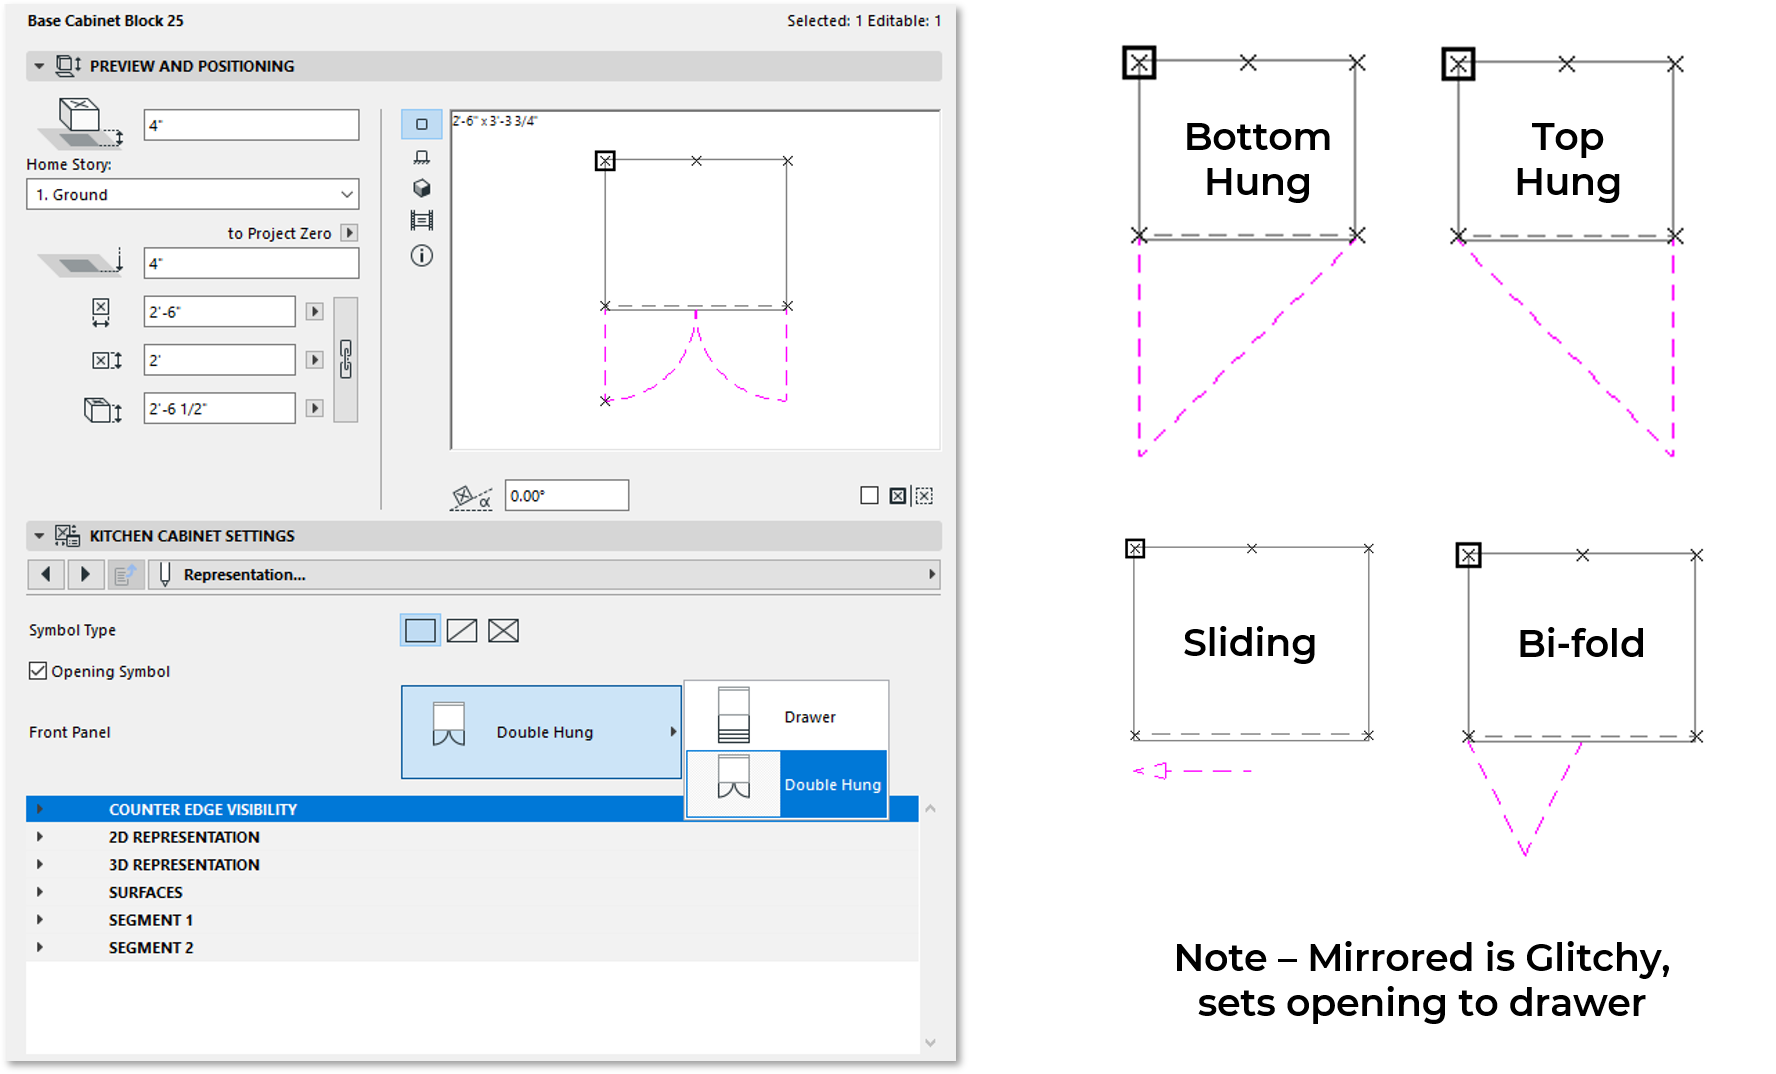
If you don't mind some extra linework on your kitchen layout drawings, these symbols definitely can add that necessary feedback to quickly understand drawer counts, and door opening settings.

Also, by adding an X symbol, we can clearly pick out wall mount cabinets.
Hopefully in the future, these opening symbols will become available as part of the Model View Options, so they can quickly be turned on and off.
2D / 3D Representation Settings
And you can modify pens, lines, fills and surface settings all within this dialogue. Often if I'm making changes to multiple objects at once, I'll jump straight to the Representation settings, and adjust here to assign throughout.
Minimal Space
If you've turned on the clearances within Model View Options, you'll see both opening symbols, and clearances at the same time.
MEP Connections
The MEP connections haven't changed much in the new casework objects, but Cold Water, Hot Water, and Waste Water can be added to the objects, regardless of where a counter, sink, and tap even exist.
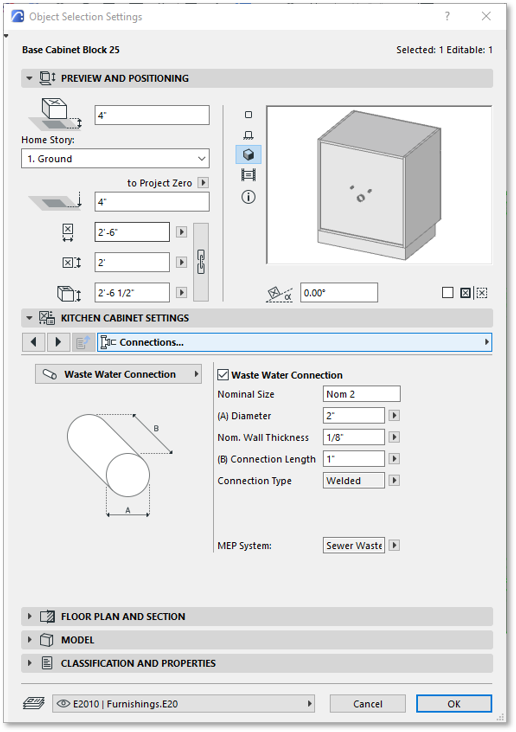
And of courses there's the same descriptions available as before!
Sooo, that is the new BASE CABINET BLOCK 25!
Of course we have about 20 other variations of this object, including options for:
- Chamfered Cabinets
- End / Shelving Cabinets
- Full Height (Standing Options)
- Wall Mounted Options
- Corner Options (C, S & L styles)
- and a new countertop option, without casework!
Plenty of ways to modify and adjust these objects to fit kitchens, baths, closets, entertainment units, laundry units, and any other place where doors, drawers, shelves, and countertops may be needed!
I hope you enjoyed this read, and learned a few tips and tricks on the casework objects!
Do you want more Archicad Training, Templates and Discussion?
Consider becoming a member of the CONTRABIM Membership Site and Community!
Learn more here

Stay connected with news and updates!
Join our mailing list to receive the latest news and updates from our team.
Don't worry, your information will not be shared.
We hate SPAM. We will never sell your information, for any reason.
