
Upgrading ARCHICAD Surfaces to Version 23
Dec 13, 2019Check out the new materials for ARCHICAD 23, fully configured CONTRABIM style! This year I'm putting a much larger emphasis on visuals, and trying to get the most out of ARCHICAD surfaces, fills, pens, and materials. Learn more in this video and blog!
Hi Everyone! Well it's definitely that time of the year when I'm making my upgrades from ARCHICAD version 22 to 23.
This year was pushed back slightly, as I wanted to finish up the AMT+C5D MasterTemplate collaboration before fully diving in and upgrading my own template.
But I'm so excited to be done and moving onto some big upgrades coming to CONTRABIM in the 2020 release!
NEW SURFACES IN ARCHICAD 23!
If you haven't checked out the new surfaces in ARCHICAD 23, you must! Graphisoft has revamped most of them, and drastically upped the resolution and rendering settings.
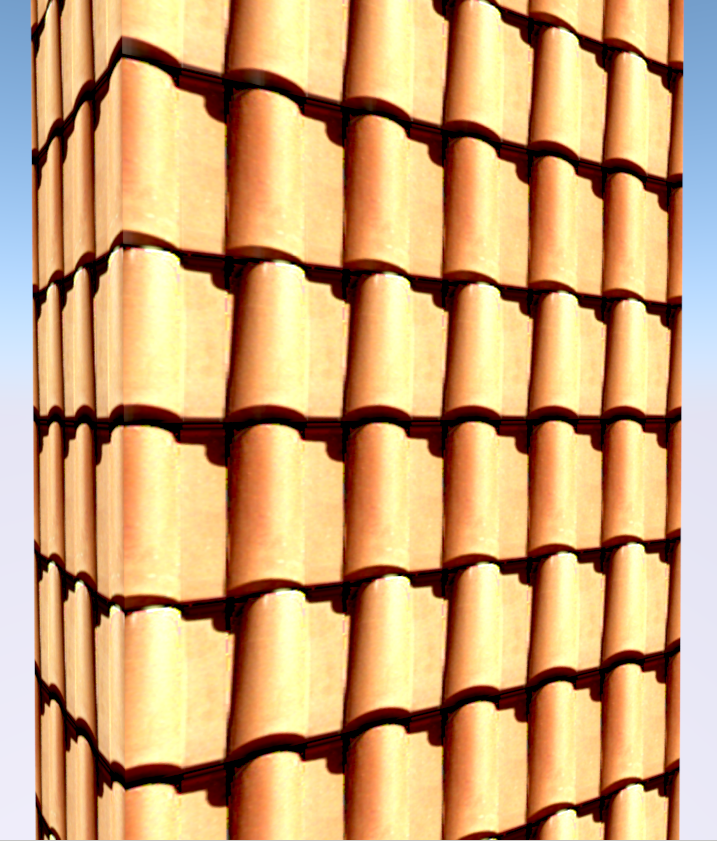
Take a look, here is just one example. The Spanish Roof Tile from before, and after..
Version 22 (left) & 23 (right) - 3D Open GL Views


New Check out the Rendered Views (General Balanced)
22 Rendered (Yes this is rendered!) vs 23 Rendered... HUGE Difference!

The Bump Mapping Channel has been drastically improved in the 23 surfaces.
Let's take a closer look at the rendering settings. Notice the bump mapping channel with high resolution imagery. This is what now sets apart the new materials. Much higher pixel size, and more fine tuned render settings for the materials. Thanks Graphisoft!

We also have a much improved Vectorial Hatching settings to go along with each of the new materials in 23.
PENS & VECTORIAL HATCHING
This year, I'm really taking my time going through to check the settings of the hatching, and making sure the hatching matches the texture pattern in size, as well as pen settings.
My goal with this, is to get the pens and hatching to match as closely to the 3D texture as possible, so it's easy to understand in sectional and elevation views, and naturally correlates with 3D texture settings.
So how am I doing these comparisons? I'll walk you through it...
This image below is 3 separate snips. The top row is a plan view with label. The imagery shown here in the background is actually snipped from an AXO 3D top view, and pasted onto the 2D plan so it's a nice quick reference...
The middle row is from section, with "own surface colors" turned on for uncut elements. These sectional views are really helpful to understand how the pens and hatching look together. This is typically where I'll go back and forth between section, and surface settings, making adjustments to the pens and fill colors as needed to try to match the surface texture image.

And this bottom row is in 2D again, but this time with cover fills turned on, and set to match exactly the vectorial hatching as setup in the surface settings.
Notice in this image the fill that does not match the texture? When I find these mismatched sizes, I'll go through and make the adjustments to the texture size, or the hatching pattern.
SCHEDULING SURFACES
I don't use too many "Surface" based interactive schedules, but this can certainly be a nice way to see everything in a single report.

I'll do another video on how to use the Surface Based Schedules soon, but there's more work to do here so I'll leave the rest for another blog post.
Thanks for reading, and I hope you're enjoying the ARCHICAD 23 new surfaces!
John, from CONTRABIM
Stay connected with news and updates!
Join our mailing list to receive the latest news and updates from our team.
Don't worry, your information will not be shared.
We hate SPAM. We will never sell your information, for any reason.
